I'll confess, love when I'm out and people comment on my nails, especially when they're surprised that I've done them myself. Often they can't grow their own nails, have the same peeling/breaking difficulties I used to, and haven't heard of soak off gels before. I've done so much research, read so many tips, seen so many videos, and tried so many things that I want to share EVERYTHING with them which of course is impossible to do. that was my inspiration for starting this, to have a 'go to' page with it all written down.
So for today, this is just an overview on what soak of gel is, and what you need to get started. Most everything I'll mention is available in a local drug store, so you don't have to go to a Sally's Beauty Supply or other specialty store.
Soak off gel (sog for short) is the advanced, friendly, easy-on-nails cousin of nail acrylics. While acrylics are strong and look great, they can really destroy your nails. Sog comes in traditional nail polish bottles that are opaque (to keep out light). They cure in UV light - this means sunlight, thought you would use either a compact fluorescent UV light or an LED light to do a sog manicure. All sogs can be cured in CF-UV lights, though not all older colours/brands can be cured in LED.
Doing the manicure is fairly simple: you apply a base coat, colour coat(s), and top coat, 'curing' it under the light each time. It cures hard, so no smearing, drying time, or chipping. Like magic! When you're ready to remove it you just use acetone or an acetone based remover, and soak your nail with it (hence 'soak off' gel).
Equipment
Here are the basic things you'll need to do your own sog mani at home:
*
A CURING LAMP- Of the two options, CF-UV or LED, I prefer LED. Cures in 30-45 seconds as opposed to 2-3 minutes in CF-UV, so it's quicker, and your hands are exposed to UV for a fraction of the time. Also you don't have to worry about the lights fading out and needing to be changed.
You can get a big light to do a whole hand at once (over $100), or a smaller one that does 4 fingers or 2 thumbs at once (much more common). I've tried a few and now use the
Kiss LED light, which I love and is only $20-$30, a great price-point.
*
CUTICLE TOOL - An orange stick,
cuticle pusher, or simple '
curette' type tool will do to ensure your cuticles are pushed back. Even better, also get some
cuticle removal lotion to use on the invisble cuticle that can overgrow on the nail - if that isn't removed then your sog will lift and peel.
Do not use cuticle cutters - cutting your cuticles can result in deep infections, bone infections, etc which are not worth it, and look terrible. (If you do ever nick them accidentally, use a bit of vinegar on them after to kill the bacteria that can enter.)
*
NAIL FILES/BUFFERS - get 2 or 3 of different grit files, you'll want a
fine/ultra fine, a
mid-grit file, and a
coarse file. Don't use nail clippers as they damage your nail tip, and when possible file in only one direction.
*ALCOHOL - Not a martini (though I won't tell if you don't), but a bottle of rubbing/isopropyl alcohol, preferably 99% or at least 90% (in a pinch 70% will do). Relatively cheap in drug stores, this is essential for prepping and dehydrating your nail, wiping gel off your skin/cuticle prior to curing, wiping the nail after top coat, and cleaning up additional brushes, dotting tools, etc.
*LINT-FREE WIPES - Lots of brands, get one that's inexpensive, I get a little pink box of
OPI brand and they're great. Use these for prepping the nail and any time you need to wipe between layers, and for the final wipe.
*CLEAN UP TOOL - For wiping around your nail prior to curing to catch any stray gel.
Pointy swabs dipped in alcohol first work great, or a little brush to wipe around the cuticle area, again dipped in a bit of alcohol first. The
Elf Essentials Concealer Brush is awesome for this (and only $1 - don't get the Studio one or it's too big).
*CUTICLE OIL OR CREAM - Needed all the time to keep your cuticles hydrated. I love CND Solar Oil, and regular olive oil, but any cuticle oil will do.There are some hydrating creams with glycerine that are also great (I LOVE
Glysolid, and will 'pack' it under my nails before sleep to keep them from curling during soak off).
*ACETONE BASED GEL REMOVER - For removing the gel during soak off. I've used Sally Hansen's acetone based polish remover with great success, but my favourite remover is the
RCM Erase found in drug stores (same as Gelish's). Some people use straight acetone, but it's really too drying and no faster than the Erase.
*COTTON PADS - For removing the gel during soak off. Get the square, flat ones - you'll just cut them to size. Alternately you can get special kits that will have removal pad/foil combos (pricier option).
*ALUMINIUM FOIL - Mostly for soak off if you don't use a kit. I also use it for nail art, putting gel on the foil to use dotting tool from.
*GEL PACK OR HEATING PAD - Greatly reduces soak off time, using this halves the time for me (from 15 mins to about 7, depending on sog brand). In a pinch use a towel right out of the dryer, or even a hair dryer.
Soak Off Gels
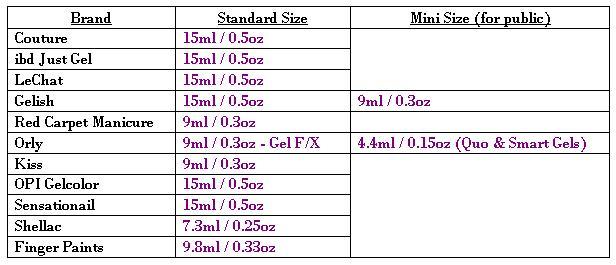
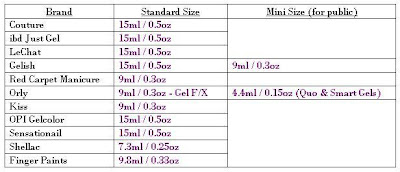
Now you need your base coat, top coat, and colours. There are so many brands of sog now that it can be a bit overwhelming where to start - I've sure done a LOT of trial and error, and tried about 15 different brands. Here are some popular brands, with a bottle size comparison:
- Kiss - available at drug stores, Walmart, etc. I'm really impressed by their product so far, in many ways superior to 'pro' lines. Their colours are great and high quality too, but only 15 colours to choose from. Their top coat is the best of all the lines I've tried - super glossy (highest shine of any brands) and more durable than any others - a must! Base coat is supposed to be great too.
- Couture - my favourite brand, super intense pigments and the fastest soak off. They easily last over 3 weeks, so wear is fantastic. Their base is great for older nails that are a bit dryer and have trouble with soak off (like mine). Colours are awesome and very pigmented with the black and white being essential to me for nail art - the only ones I've found that are opaque in one coat. Online only, here or on Amazon, 105 colours.
- ibd Just Gel - my second favorite brand, fantastic lasting time, super easy soak off, intensely pigmented colours, and I've had 3 week wear out of them. With 114 colours, marketed to pros and available online only, unless you have a pro supply store that lets you buy. (Note: same company sells duplicate colours as Progel and EZ Flow, they're all the same formula)
- LeChat - also marketed to pros, my 3rd favourite brand. Great wear and soak off, sold with a matching rnp (regular polish). Online or pro stores only. (Note: same company sells duplicate colours as Geluv, they're the same formula)
- Gelish/Red Carpet Manicure - both are the same company. Gelish mini's are the same size as all Red Carpet Manicure (RCM), and are available at Sally's. RCM is available at many drug stores. (Gelish full-size is marketed to pros, and available online.) Their base coat is extra durable, and best for younger nails (which tend to have more oil in them, older nails (over 30) are dryer). Their base is also great for applying gems.
- Orly Gel - marketed as 'Orly Smart Gels' in US stores, and 'Quo by Orly' in Canadian Shoppers Drug Mart for public use, otherwise online for pros as Orly Gel FX. Great colours, wear, and soak-off time.
- Sensationail - a drug store brand with some pretty colours. Shorter wear time, only 1-2 weeks.
- OPI - great rnp, but gels have mixed reviews. Many colours shrink when applying, so I've avoided this brand. Overpriced to boot.
- Shellac - more of a gel/regular polish hybrid than a gel, one of the more well-known gels due to heavy marketing. A lot of salons will say 'Shellac' even if it's not that brand. Originally only CF-UV curable, newer colours are LED formulated too; online or pro stores only, quite overpriced for what you get.
- Finger Paints - Sally's brand. Some nice colours, good price. While I've not tried it, many friends have and have found them to be difficult.
Note: Be careful when buying online, and always check reviews. If a price seems too good to be true, it probably is; there are fakes out there. Always check reviews. One trustworthy online store I use a lot is http://stores.ebay.com/stayyglamm, I've bought from here dozens of times, and the owner (Chad) is very flexable, ships quickly, and only sells authentic products.
This should get you started, I'll go over basic application in my next post. :)